Motherboard installation/standoffs
If we learned, how to install the motherboard. We will learn how to install all other devices because the other devices are connected to the mother board. You will notice that the motherboard comes pre-configured with numerous slots where you can plug devices in. Additionally, there are connectors and hurdlers that you will need to set to make it work properly.
Here the steps of install a motherboard of any computer.
1. Open the Case and Remove
Motherboard Tray. The first step will be to open the case. The technique
for doing this will vary dependent upon the case you have. For mid-towers, you
will most likely have to remove a side panel that sits above where the
motherboard will be.
2. Unscrew the two screws holding this panel onto your computer and slide it out. Fixed the screws in a safe place. If you have an older style case you may have to remove all of the screws from the back of the box, and slide that out.
3. If your case has a motherboard platter you will need to remove that as well. Some cases have removable motherboard trays meant to help you better install motherboard units correctly. These trays are quite useful and can make installing your motherboard much easier. If your case has such a tray, be sure to remove it as well.
4. Change the ATX Connector Plate and Bring into line Motherboard with Case. If you check all the parts that came pushed with your motherboard, you will notice that it came with its own face plate. This might seem rare, as your computer case will have an ATX face plate already installed. The problem here has to do with possible unsuitability. Your ATX face place may have connectors decided in a different pattern than the one that came with your box. Therefore, it’s best to use the tradition face plate that came with your motherboard. To switch out the computer case face plate, press both corners until it pops out. Quick the new plate in place, aligning the keyboard and mouse connectors to the side of the case where your power supply is installed.
5. Install Standoffs and Secure the Motherboard. The next step in knowing how to install a motherboard involves position. You want holes from the case to match the holes from the motherboard--however there’s more to it than that. First, locate the swelling holes in the case or tray that will match up with those of the motherboard.
6. When you found the holes, it’s time to install the standoffs. Standoffs are mostly brass or plastic pegs that will support the motherboard as it installed. These pegs or spacers come in different ranges; some will be brass while others will be plastic. Check which ones you have. If the standoffs are of the brass variability, you may need a spell tool of some sort in order to properly install them. Install the standoffs into the holes that you recognized earlier.
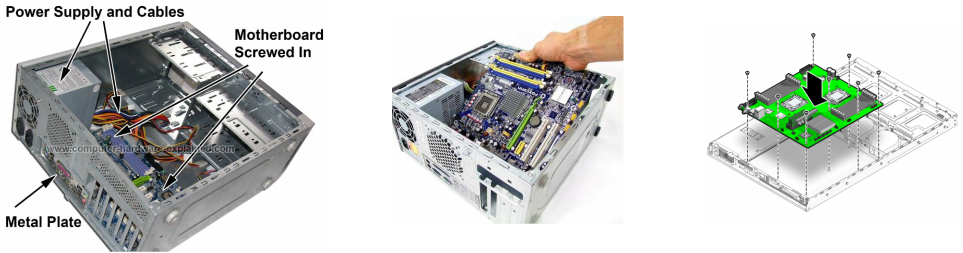
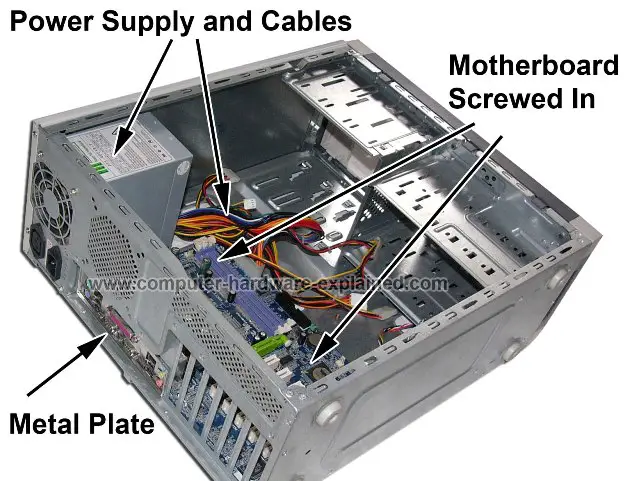
7. With the standoffs tightly installed, it’s time to secure the motherboard. Support the motherboard over your case or tray so that you can see the standoffs clearly through their similar holes on the motherboard. Then begin from the center of the motherboard to screw the motherboard to your tray or case.
8. After you complete that, continue clockwise, fixing the screws into the mounting holes in all of the corners of the board. As you can see, knowing how to properly install motherboard units to your PC includes more than just a few turns of the screws!
9. Installing Critical Wires and Connectors. The next step in expressive how to install computer parts like your motherboard is to install critical wires and connects. Just because your motherboard is physically installed doesn’t mean it can communicate with the rest of your system.
10. Connect some important wires and cables to complete the process. The first wires are the ones that hang loose from your case, like hard drive, power, reset and speaker leads. Research about how you can plug these wires into their appropriate slots in the case.
11. The next cable is the one that feeds juice to your motherboard, the 20 pin ATX power lead from your power supply. Plug that in the suitable slot in the motherboard. Some newer computers like the Pentium 4 may also include an additional 4 pin 12v connector from the power supply, which you must plug into the motherboard as well. Check that all of the critical wires are secured. If you used a removable tray you can reinsert that into the case at this time.
2. Unscrew the two screws holding this panel onto your computer and slide it out. Fixed the screws in a safe place. If you have an older style case you may have to remove all of the screws from the back of the box, and slide that out.
3. If your case has a motherboard platter you will need to remove that as well. Some cases have removable motherboard trays meant to help you better install motherboard units correctly. These trays are quite useful and can make installing your motherboard much easier. If your case has such a tray, be sure to remove it as well.
4. Change the ATX Connector Plate and Bring into line Motherboard with Case. If you check all the parts that came pushed with your motherboard, you will notice that it came with its own face plate. This might seem rare, as your computer case will have an ATX face plate already installed. The problem here has to do with possible unsuitability. Your ATX face place may have connectors decided in a different pattern than the one that came with your box. Therefore, it’s best to use the tradition face plate that came with your motherboard. To switch out the computer case face plate, press both corners until it pops out. Quick the new plate in place, aligning the keyboard and mouse connectors to the side of the case where your power supply is installed.
5. Install Standoffs and Secure the Motherboard. The next step in knowing how to install a motherboard involves position. You want holes from the case to match the holes from the motherboard--however there’s more to it than that. First, locate the swelling holes in the case or tray that will match up with those of the motherboard.
6. When you found the holes, it’s time to install the standoffs. Standoffs are mostly brass or plastic pegs that will support the motherboard as it installed. These pegs or spacers come in different ranges; some will be brass while others will be plastic. Check which ones you have. If the standoffs are of the brass variability, you may need a spell tool of some sort in order to properly install them. Install the standoffs into the holes that you recognized earlier.
7. With the standoffs tightly installed, it’s time to secure the motherboard. Support the motherboard over your case or tray so that you can see the standoffs clearly through their similar holes on the motherboard. Then begin from the center of the motherboard to screw the motherboard to your tray or case.
8. After you complete that, continue clockwise, fixing the screws into the mounting holes in all of the corners of the board. As you can see, knowing how to properly install motherboard units to your PC includes more than just a few turns of the screws!
9. Installing Critical Wires and Connectors. The next step in expressive how to install computer parts like your motherboard is to install critical wires and connects. Just because your motherboard is physically installed doesn’t mean it can communicate with the rest of your system.
10. Connect some important wires and cables to complete the process. The first wires are the ones that hang loose from your case, like hard drive, power, reset and speaker leads. Research about how you can plug these wires into their appropriate slots in the case.
11. The next cable is the one that feeds juice to your motherboard, the 20 pin ATX power lead from your power supply. Plug that in the suitable slot in the motherboard. Some newer computers like the Pentium 4 may also include an additional 4 pin 12v connector from the power supply, which you must plug into the motherboard as well. Check that all of the critical wires are secured. If you used a removable tray you can reinsert that into the case at this time.
Video shows install a motherboard.
The safety way of changing motherboard:
- Be sure the power of the computer is off to not shock from the electric.
- Wait 10 minutes after turn off the computer.
- Don't put any foods or drinks near of the computer.
Summary :
Generally we have to secure yourself by shutting down all the powers from the computer when we are replacing any parts of the computer. so in the section i described the way of install the motherboard in our computer by writing the steps and show it by the video too.
References:
Motherboard picture, (n.d). Retrieved from http://www.computer-hardware-explained.com/image-files/the-computer-after-the-motherboard-had-been-installed.jpg
Zack, Tom Viren, AcridGosling, Maluniu and 12 others , (n.d). How to install a motherboard. Retrieved from http://www.wikihow.com/Install-a-Motherboard
